NSString-Japanese
NSString category methods for working with Japanese strings
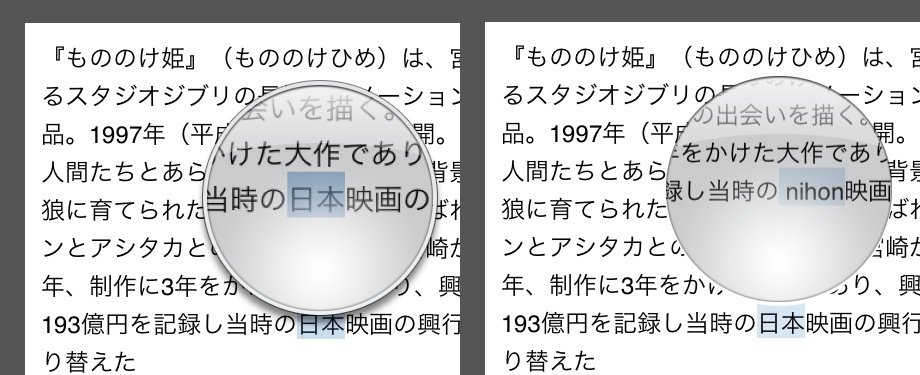
The Language Loupe
A text magnification loupe normally appears when you press and drag over text in iOS. In this example we’re going to not only recreate the loupe that appears but also change what it magnifies.

NSString-Japanese
There is some really awesome stuff in Foundation and CFStringTokenizer is one of them. With CFStringTokenizer you can determine the language of an arbitrary sentence, obtain the latin script of a language (such as Japanese) and enumerate words in sentences in languages that don’t delimit words by space.
Japanese writing is composed of Kanji, Hiragana, and Katakana. The latin transcription of Japanese is Romaji.
To obtain the Romaji for a given string, you create a CFStringTokenizer instance with the string, enumerate over each token and request the latin attributes for each token.
The NSString-Japanese categories reduce these steps to one line and are the focus of this repository. You can look at source implementation to see how you might use CFStringTokenizer for another language or in other ways.
The Loupe
The loupe is simply a custom UIView with three important features. Our custom view contains a UIImageView subview, a content view to magnify, and rectangle region within the content view to magnify. These features enable us to present the glass image, and draw dynamic contents for the loupe.
Let’s look at the drawRect implementation.
-(void)drawRect:(CGRect)rect{

    if(!_loupeContentView)
        return;

    CGContextRef context = UIGraphicsGetCurrentContext();
    CGContextClearRect(context,rect);

    UIBezierPath* bPath = [UIBezierPath bezierPathWithOvalInRect:CGRectInset(rect,7,7)];

    CGContextAddPath(context,bPath.CGPath);
    CGContextClip(context);

    CGContextTranslateCTM(context, -_loupeContentRect.origin.x, -_loupeContentRect.origin.y);
    [_loupeContentView.layer renderInContext:context];

}
- We get the current context and clear it.
- Create circular path(the shape of the loupe glass), add the path to the context, and clip the context. This essentially restricts drawing to the path of the circle.
- We flip the coordinates (for CoreGraphics) and finally draw contents of the contentView in our clipped context.
If you wanted to magnify the contents of the loupe, you would simply scale the context before rendering loupe contents in the graphics context.
Back off UIKit
By default in UIKit presents its own loupe view when the user presses over text. To prevent this, it is useful to remember that UIApplication sends events to the window first and that UIWindow is a subclass of UIView. We can alter default behavior by overriding UIWindow’s hitTest method. So we subclass UIWindow and create a hitTestDelegate to gain greater control. This is will let us control when we want the UIKit’s controls to appear or not.*
Here’s the implementation of our new hitTest method in our new window subclass.
-(UIView*)hitTest:(CGPoint)point withEvent:(UIEvent *)event{

    UIView* original = [super hitTest:point withEvent:event];

    if([self.hitTestDelegate respondsToSelector:@selector(viewForHitTest:withPoint:event:andOriginalView:)])
        return [self.hitTestDelegate viewForHitTest:self withPoint:point event:event andOriginalView:original];


    return original;
}
- We call super and keep a reference to the view that UIKit would like to return.
- We return the result of our own hitTestDelegate method.
I’ve implemented this hitTestDelegate in our demoView Controller. Here’s that implementation.
-(UIView*)viewForHitTest:(SLGDemoWindow*)window withPoint:(CGPoint)point event:(UIEvent*)event andOriginalView:(UIView*)originalView{

    if(self.visibleTextView.editable)
        return originalView;

    if(!self.languageLoupeSwitch.on)
        return originalView;

    if([originalView isDescendantOfView:self.visibleTextView]){
        return self.view;
    }
    return originalView;
}
- If the text view instance is editable or if our custom language loupe is disabled we simply return the original view intended by UIKit.
- If the originalView that UIKit returned from its hitTest is a subview of UITextView or the UITextView itself, then we return our viewController’s view. Our viewController’s view has a press gesture attached to it and can respond accordingly.**
Slight of hand
Instead of displaying of the original textView inside the loupe, we’ll display the selected Japanese text but converted to Romaji or Hiragana. To accomplish this, we create another textview and insert it behind the visible textView. We assign our ‘secret’ textView to our custom loupe view. The loupe view will render ‘secret’ textView contents instead of the visible textView.
There are lot of steps to updating contents of the loupeView. Let’s walk through them
-(void)_updateLoupeWithPoint:(CGPoint)point{


    UITextPosition* pos = [self.visibleTextView closestPositionToPoint:point];

    id<UITextInputTokenizer> tokenizer =self.visibleTextView.tokenizer;
    UITextRange* textRange =
    [tokenizer rangeEnclosingPosition:pos
                      withGranularity:UITextGranularityWord
                          inDirection:UITextWritingDirectionLeftToRight];

    if(!textRange)
        return;

     NSRange wordRange = [[self class]rangeForTextRange:textRange inTextView:self.visibleTextView];


    CGRect caretRect= [self.visibleTextView caretRectForPosition:pos];

    CGRect loupeFrame;
    loupeFrame.size = _loupeView.glassSize;
    loupeFrame.origin = [self.view convertPoint:caretRect.origin fromView:self.visibleTextView];
    loupeFrame = CGRectOffset(loupeFrame,-loupeFrame.size.width/2,(-loupeFrame.size.height+10));


    NSRange convertedRange;
    [self _updateSecretTextViewTextWithRange:wordRange convertedRange:&convertedRange];


    UIBezierPath* magnifyPath = [[self class]pathForRange:convertedRangeinTextView:self.secretTextView];
    CGRect rectToMagnify;
    rectToMagnify.size =_loupeView.glassSize;
    rectToMagnify.origin = CGPathGetBoundingBox(magnifyPath.CGPath).origin;
    rectToMagnify  = CGRectOffset(rectToMagnify,-rectToMagnify.size.width/2,(-rectToMagnify.size.height/2.5));


    [CATransaction setDisableActions:YES];
    _textViewSelectionLayer.path = [[self class]pathForRange:wordRange inTextView:self.visibleTextView].CGPath;
    _outputSelectionLayer.path = magnifyPath.CGPath;
    [CATransaction commit];


    _loupeView.loupeContentRect = rectToMagnify;
    _loupeView.frame =loupeFrame;
    [_loupeView setNeedsDisplay];


}
- Note that the updateLoupeWithPoint: method is passed a point in the ‘visible’ textView’s coordinate space from the press gesture.
- Calculate the NSRange of the word closest to the point in the string contents of the ‘visible’ textView.
- Calculate the loupe frame using the size of the loupeView glassImage and position of the selected word.
- Update the contents of the ‘secret’ textView to reflect the selected text changes.
- Use the range of the word converted (to Romaji or Hiragana) to calculate the rectangle contents of the loupeView.
- Update the fill paths of our ‘fake’ selection layers. I’ve inserted 2 CAShapeLayers into each of these textViews. Adding a subview to a UITextView doesn’t play well with UITextView internals. But adding CALayer to it’s sublayer works well enough. This is allows us to mimic the some of selection interface that UIKit presents.***
*Another approach would be to subclass UITextView and override the hitTest implementation and handle the logic (via delegation or internally) as well.
**The subviews of UITextView (UITextRangeView and UISelectionGrabber) are private classes so [UIView isDescendantOfView] is a good candidate for checking without explicitly referring to those classes.
***The demo ViewController contains some methods around calculating the text positions and paths. There’s a much more complete set of methods located here.
Final Thoughts
While this pretty cool effect, admittedly it’s not perfect. There are issues with word wrapping in the secret textView, the glass image, and the selected text is sometimes clipped. Perhaps the clipping issue could be addressed with a bit more math and using a resizable image inside the loupeView.
Thanks for reading!